Venice photography itinerary: three days, the best light, the real locations
Instagram tour of Venice with a private photographer
Photography in Venice: what you need to know first
Venice photographs easily and badly. Easily because the city is so inherently picturesque that almost any camera pointed in almost any direction produces a recognisable image. Badly because those recognisable images — the gondola from the Rialto bridge, the pigeons at San Marco, the mosaics lit by tour group flash — are what every other photographer has produced, in the same conditions, for the past 70 years.
This itinerary is for people who want different images. The strategy has three components: timing (early morning, late afternoon, and after midnight), locations (specifically not the main tourist viewpoints during peak hours), and the willingness to move when the light moves.
The best photography conditions in Venice are, in roughly descending order:
- Sunrise in June–October (long light, near-empty streets)
- Golden hour (one hour before sunset) in any season
- After midnight in winter (fog, reflections, silence)
- Overcast days in winter (the soft light eliminates the harsh shadows that complicate midday shots)
- Midday in summer (the worst light, the most crowded conditions)
If your trip is July–August and you are not shooting before 8am, you are working against the light and the crowds simultaneously.
Day 1: Venice — sunrise and the morning streets
Pre-dawn: the alarm you will not regret
5:30am — Wake up
Yes. The single best photographic move in Venice is being at Piazza San Marco at first light, before the tourist groups assemble. In June, sunrise is before 5:30am. In October it is around 7:15am. Our sunrise photography guide has exact times by month.
The piazza at this hour is extraordinary. The Basilica’s golden mosaics catch the early light while the square is empty; the reflected paving stones double the architecture. The pigeons are the only other presence, and they are a compositional asset rather than an obstacle.
6:00am — Walk to the Molo
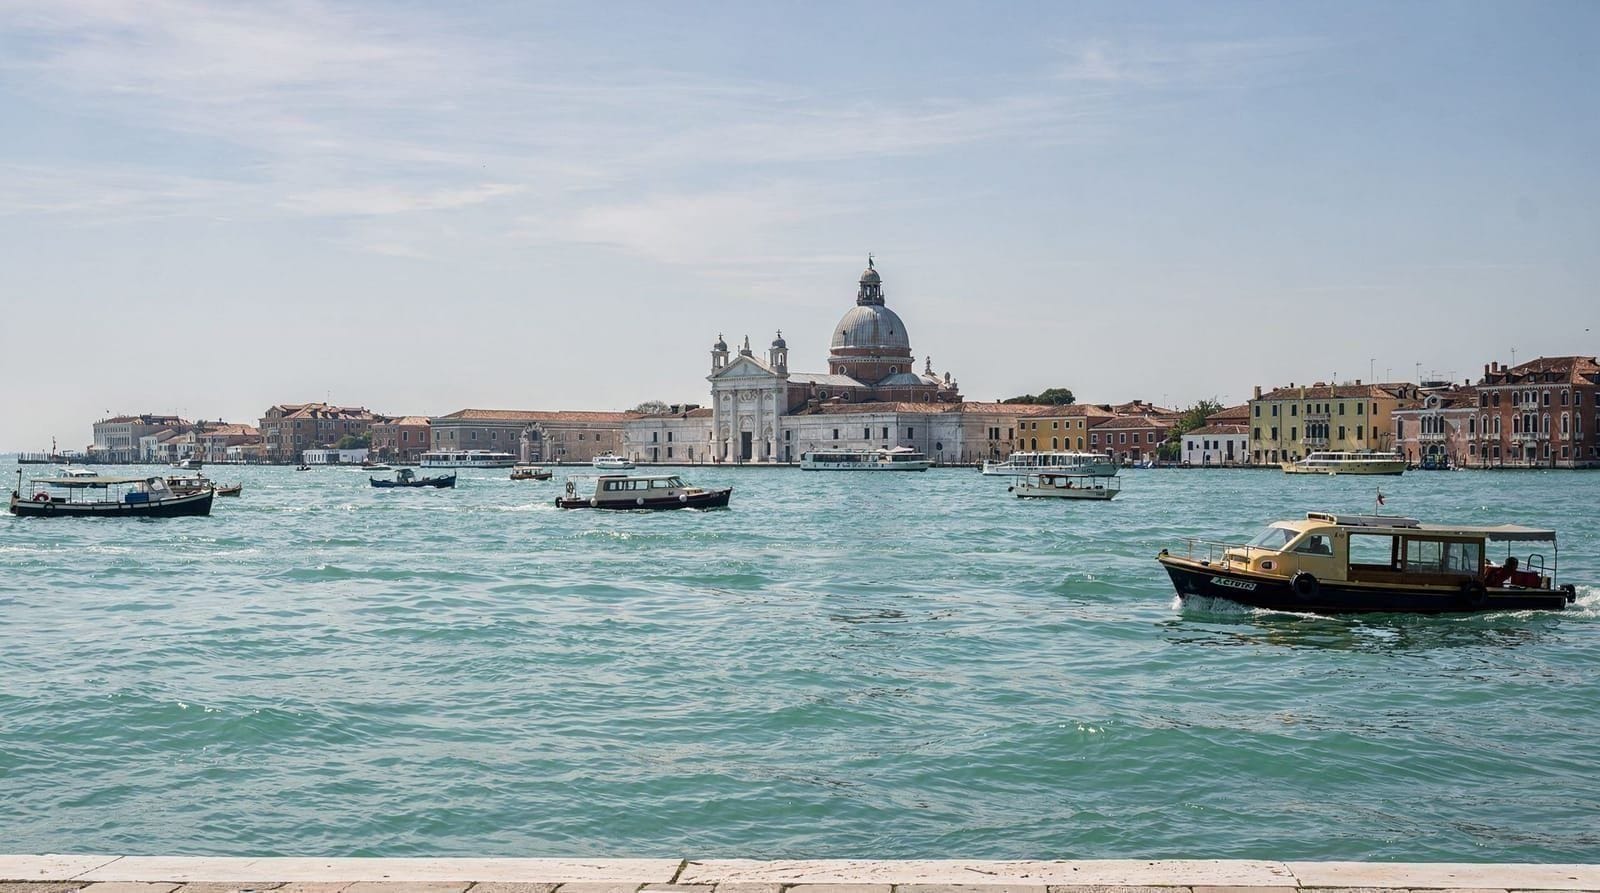
From the piazza, cross to the Molo waterfront and face east across the Bacino di San Marco. The sunrise comes up behind San Giorgio Maggiore — the composition of the domed church in silhouette against an orange sky is one of Venice’s defining images.
Walk east along the Riva degli Schiavoni to the Arsenale gate. At this hour the waterfront belongs to delivery boats, fishermen, and very few photographers.
7:30am — Rialto bridge before anyone arrives
Walk to the Rialto bridge. At 7:30am the fish market is just opening and the tourist pressure has not yet built. The view from the top of the bridge at this hour — both up and down the Grand Canal — is significantly better than the same view at noon.
Key shots from the Rialto:
- Looking upstream (north): the curve of the Grand Canal and the Ca’ d’Oro palace
- Looking downstream (south): the curve toward the Accademia with boats on the water
- The market stalls from the bridge: fish, produce, the traders setting up
8:30am — Coffee and breakfast
You have been awake for three hours. Eat at a bar near the market — coffee and a cornetto at the counter, €2.50. Then plan the day.
Morning: the side canals
9:00am–12:00pm — The smaller canals of San Polo and Santa Croce
The photogenic side canals are not secret, but they are significantly less crowded before 10am than after noon. The key spots:
Rio della Madonna (parallel to the Grand Canal in San Polo): a narrow canal with a bridge at each end that creates natural framing. The morning light reaches the water between 9 and 11am.
Campo San Giacomo dell’Orio (Santa Croce): a quiet campo that feels like the Venice the tourists have not found, though it is 10 minutes from the Rialto. Beautiful at any hour, best in morning light.
Ponte del Diavolo (the ‘Devil’s Bridge’ in Torcello — though for day one, just note the principle): small bridges over small canals are consistently more photogenic than the Rialto and the Accademia because they are human-scaled and not overshot.
Read our best photo spots guide for a full location map with optimal times.
12:00pm — Lunch and midday rest
Midday light in Venice is flat and harsh. Take the 12–2pm period for lunch, rest, and equipment review. Good cicchetti near the Rialto: All’Arco or Do Mori, €10–12 standing.
Afternoon: gondolas and the side canals
2:30pm — Gondola route for photography
Book a gondola specifically for photography — a private gondola gives you 30 minutes to direct the gondolier toward photogenic routes rather than the tourist standard circuit. The best routes for photography go through the narrower canals of San Polo and Cannaregio where the walls come close enough to create interesting compressed perspectives.
Gondola ride — position yourself at the back of a shared boat for the best perspectivePhotography tips from a gondola:
- Shoot from the lowest possible position — sit at the front and shoot along the water line
- The gondolier’s silhouette against a canal ahead is the quintessential Venice image; position early
- Reflections in the still water of small canals are extraordinary in afternoon light
- The gondola moves constantly; use a fast shutter speed (minimum 1/250s)
4:30pm — Dorsoduro and the Zattere
Walk to Dorsoduro and the Zattere waterfront. The south-facing embankment gets the afternoon sun directly — it is Venice’s sunniest waterfront and the light on the Giudecca canal in late afternoon is exceptional.
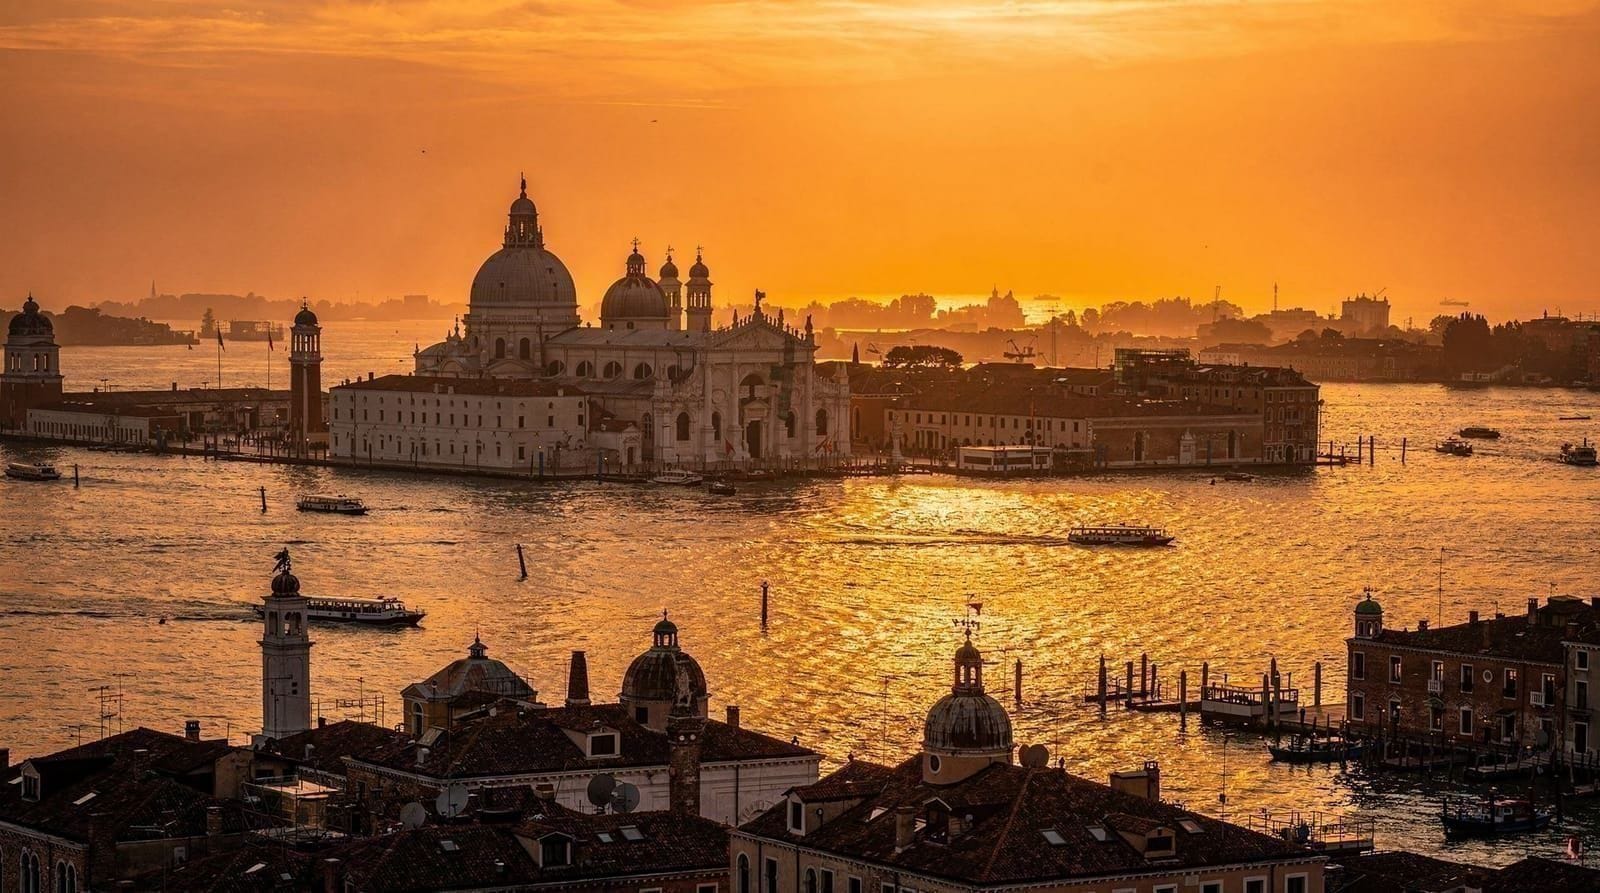
Golden hour: Punta della Dogana and the Accademia bridge
Two locations for golden hour:
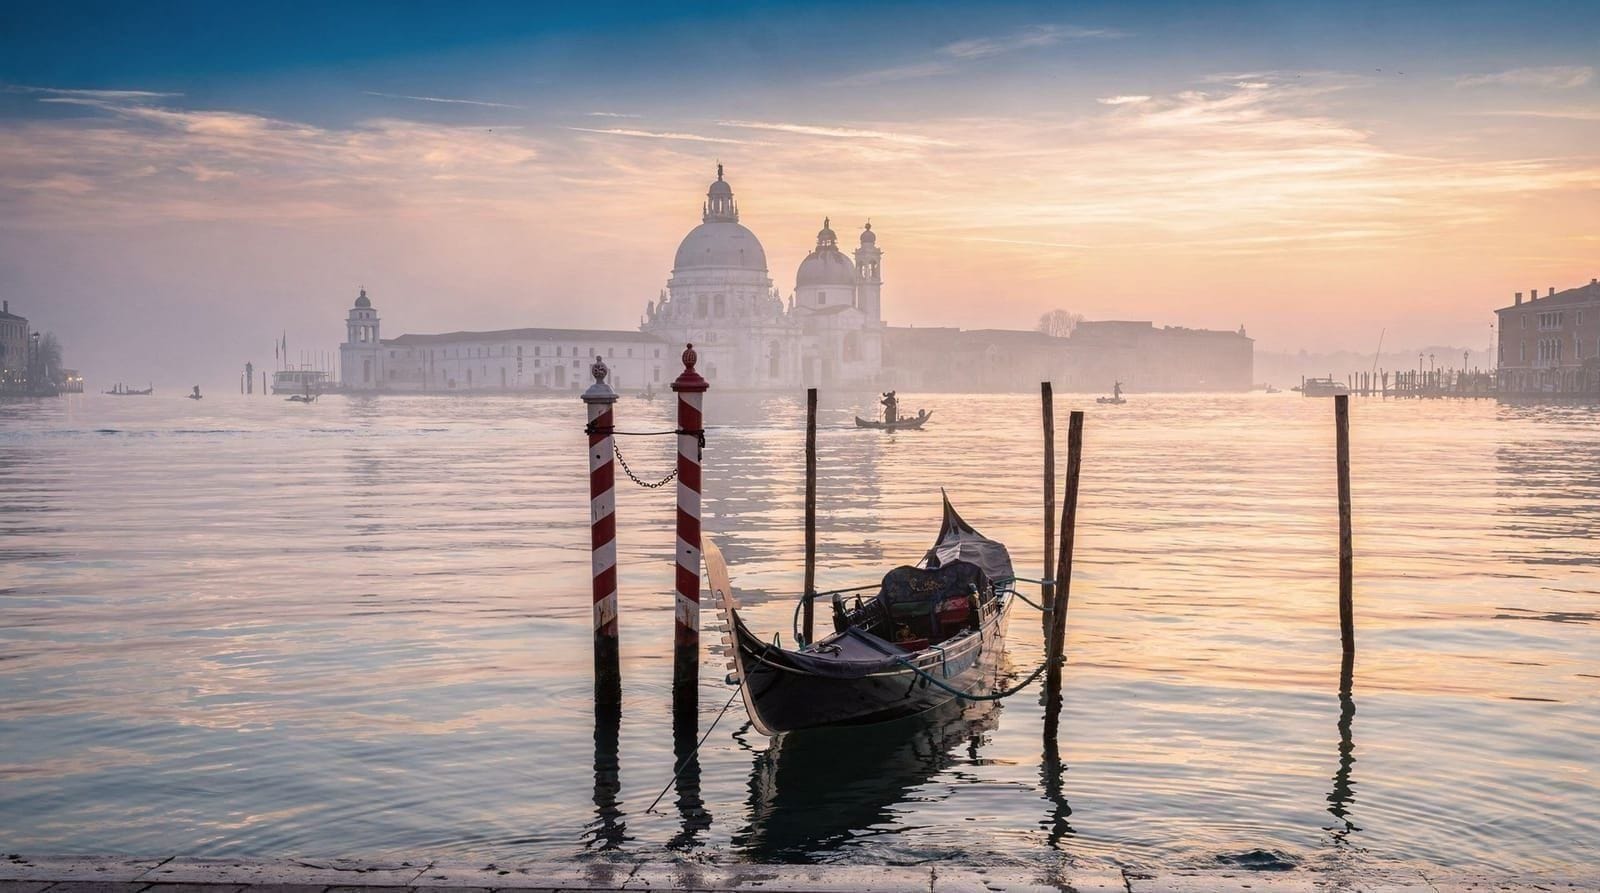
Accademia bridge: Looking west down the Grand Canal, the bridge frames Santa Maria della Salute with the setting sun behind it. The shot works from approximately 30 minutes before sunset. Our golden hour Venice guide has exact times by month.
Punta della Dogana: The tip of Dorsoduro, where the Grand Canal meets the Giudecca canal. Looking back at San Marco from the water, the Salute church, and the Molo landing stage at golden hour.
Evening: night photography
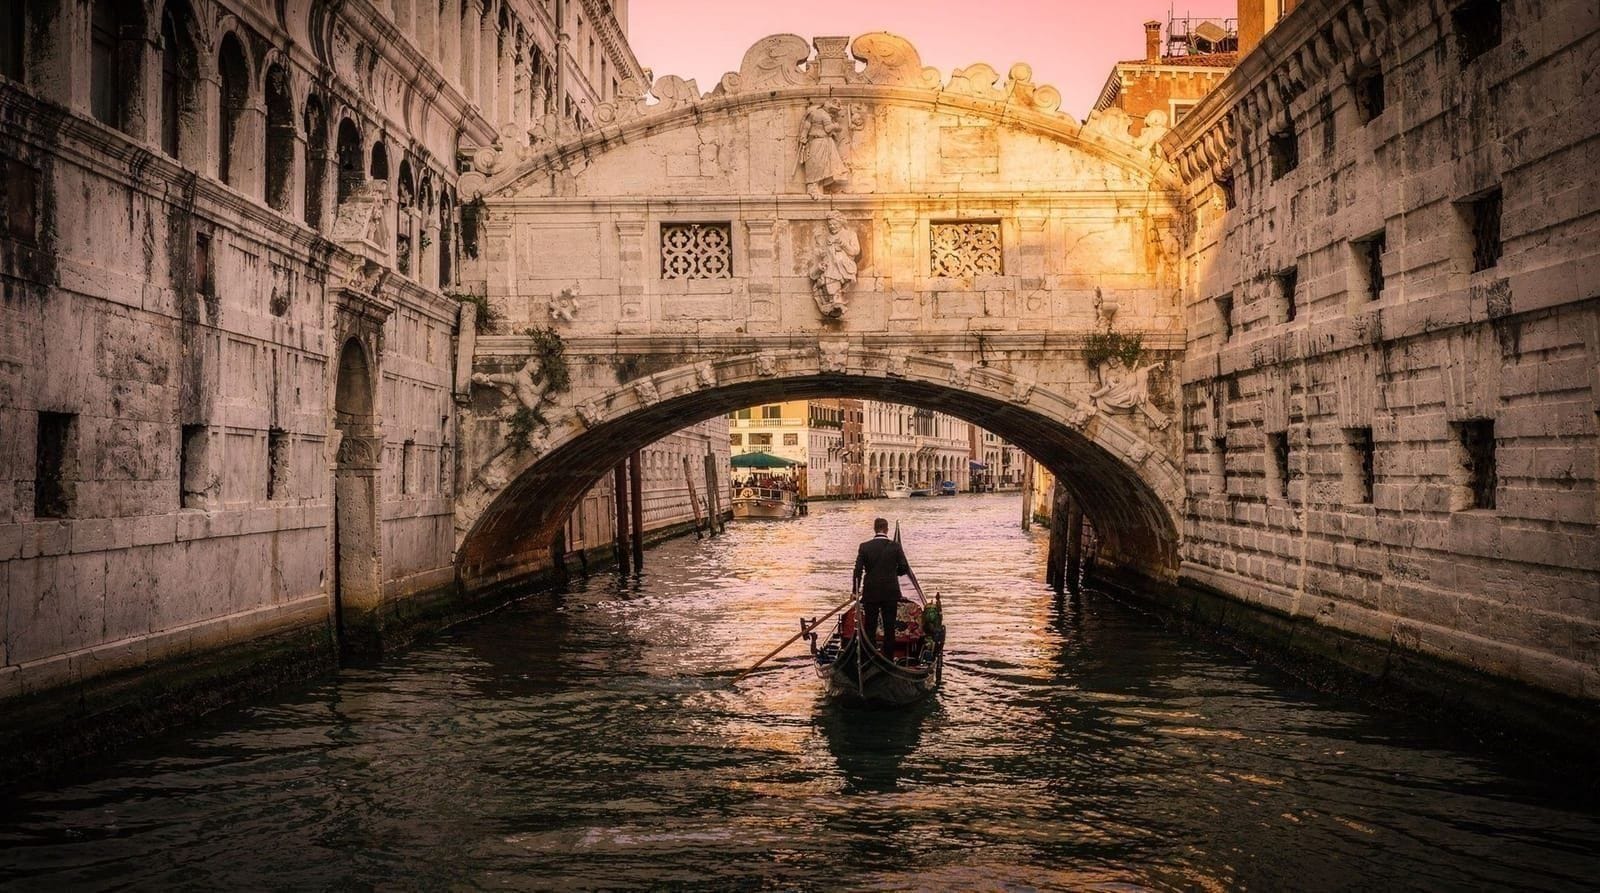
9:30pm–midnight — The bridge of Sighs by night
The Bridge of Sighs is best photographed at night from the Riva degli Schiavoni when the bridge is lit and the tourist crowds have reduced. Use a tripod (permitted in Venice) and shoot 4–8 second exposures to capture the movement of gondolas in the frame.
The Grand Canal at night, photographed from any major bridge with a long exposure, shows the boat lights as bright streaks across the dark water. The Rialto bridge lit at night is less photographed than it should be.
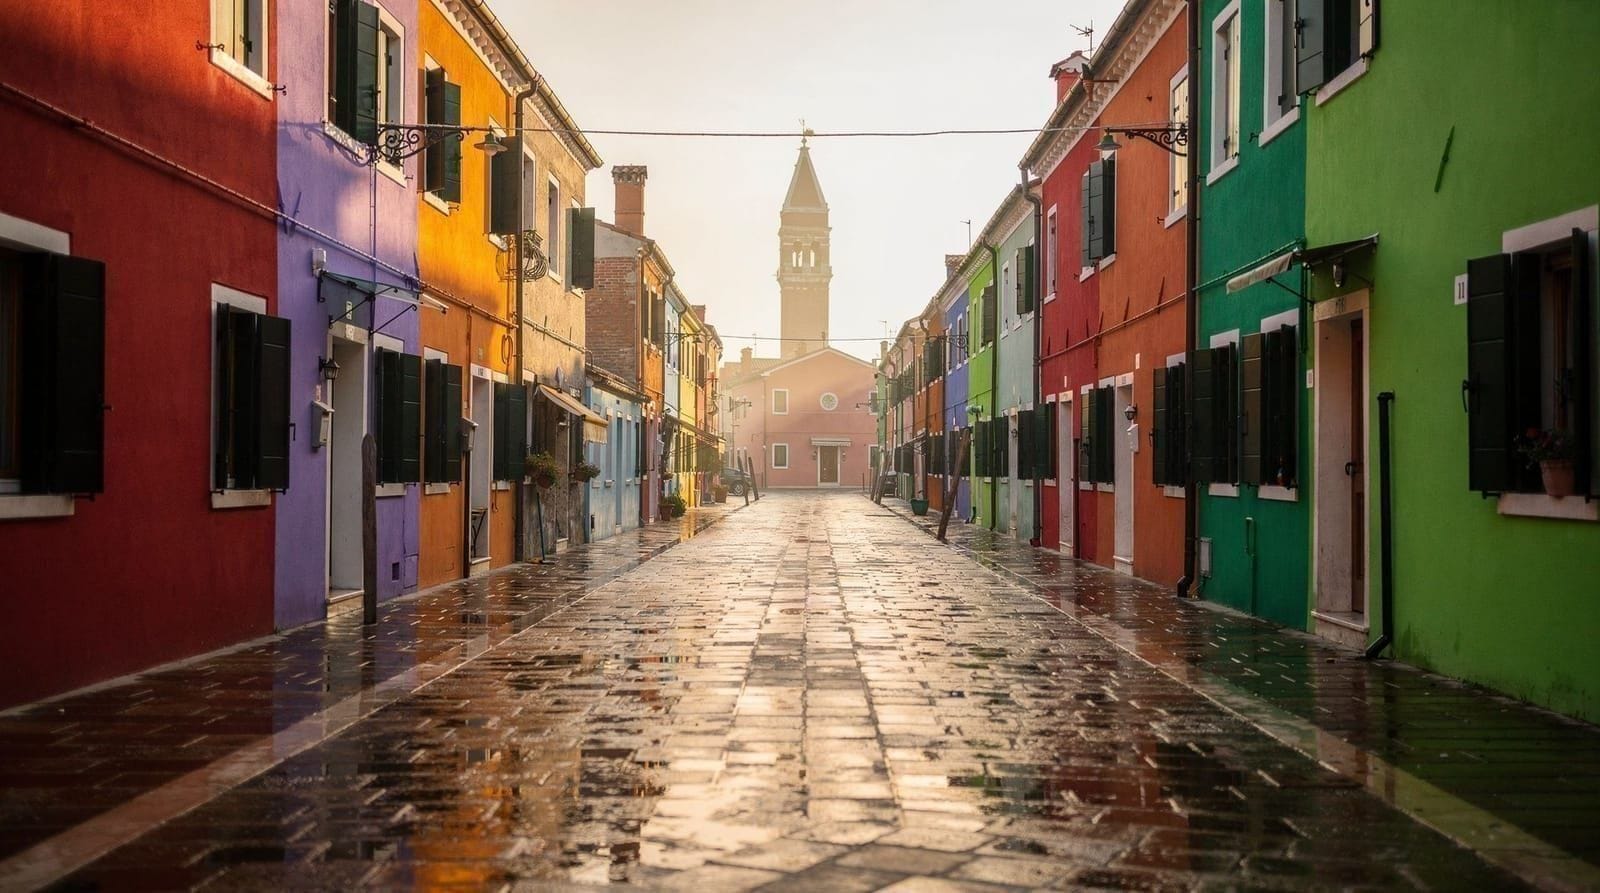
Day 2: Burano — the colour island
Burano is the most photographed island in the Venice lagoon and the most immediately rewarding for photographers who arrive at the right time.
The timing:
Burano in the morning (8–11am) is significantly better than Burano in the afternoon (noon–4pm). The morning light comes from the east and hits the coloured facades directly. The tourist groups arrive after 10am; by noon the streets are crowded with people holding phones. Leaving by 1pm is ideal.
Getting to Burano
7:30am — Depart from Fondamente Nove
Vaporetto Line 12 from Fondamente Nove to Burano takes approximately 45 minutes. The first boats depart from about 5:30am; the 7:30am departure gets you to the island around 8:15am.
Alternatively, book a photography-focused tour that includes early island access:
Instagram tour of Venice with private photographerBurano: the photography
8:15am — Walk the eastern streets first
The streets parallel to the main Via Galuppi (the tourist spine of the island) are quieter and equally photogenic. The houses are painted the same colours but the streets are narrower — better compression, more interesting foregrounds.
Key locations in Burano:
Rio della Giudecca: The canal running along the western edge of the island with coloured houses on both banks. At 8–9am the light comes over the house tops and creates a warm wash across the facades. The bridge across this canal (Ponte San Giacomo, no tourist name) is one of the island’s best photography spots.
The fishing boats: Burano’s working fishing boats are moored along the canals in the early morning. Brightly painted and weathered, they complement the house colours.
The doorways: Individual doorway details — old wood, flaking paint, potted plants against coloured walls — are worth spending time on. They reproduce at phone resolution as well as they do on medium format.
Read the full Burano photography guide for the specific street names and optimal approach routes.
10:30am — Lunch in Burano
Trattoria da Romano (Via Galuppi 221) is the island’s best restaurant. The risotto di go (goby fish risotto) is a lagoon speciality unavailable in most Venice restaurants. Book ahead for lunch; they fill quickly. Budget €30–40 per person with wine.
12:30pm — Return to Venice
Leave before the full midday rush. Line 12 back to Fondamente Nove.
Afternoon: photography workshop or private session
3:00pm — Private photo walk with a Venice photographer
If portrait or couples photography is the goal, book a private session for the afternoon. The best photography guides in Venice cover both the technical aspects (light, composition) and the location logistics (which bridges are empty at what times, how to handle gondola permissions).
Private photo walk with a Venice photographer guide (2.5 hours)5:30pm — Golden hour in Cannaregio
Cannaregio at golden hour has a quality that Dorsoduro and San Marco do not — it is residential, the evening light falls along the canals in long horizontal strips, and the boats returning from the day’s work create movement in the water. The Fondamenta della Misericordia at 6pm is particularly good.
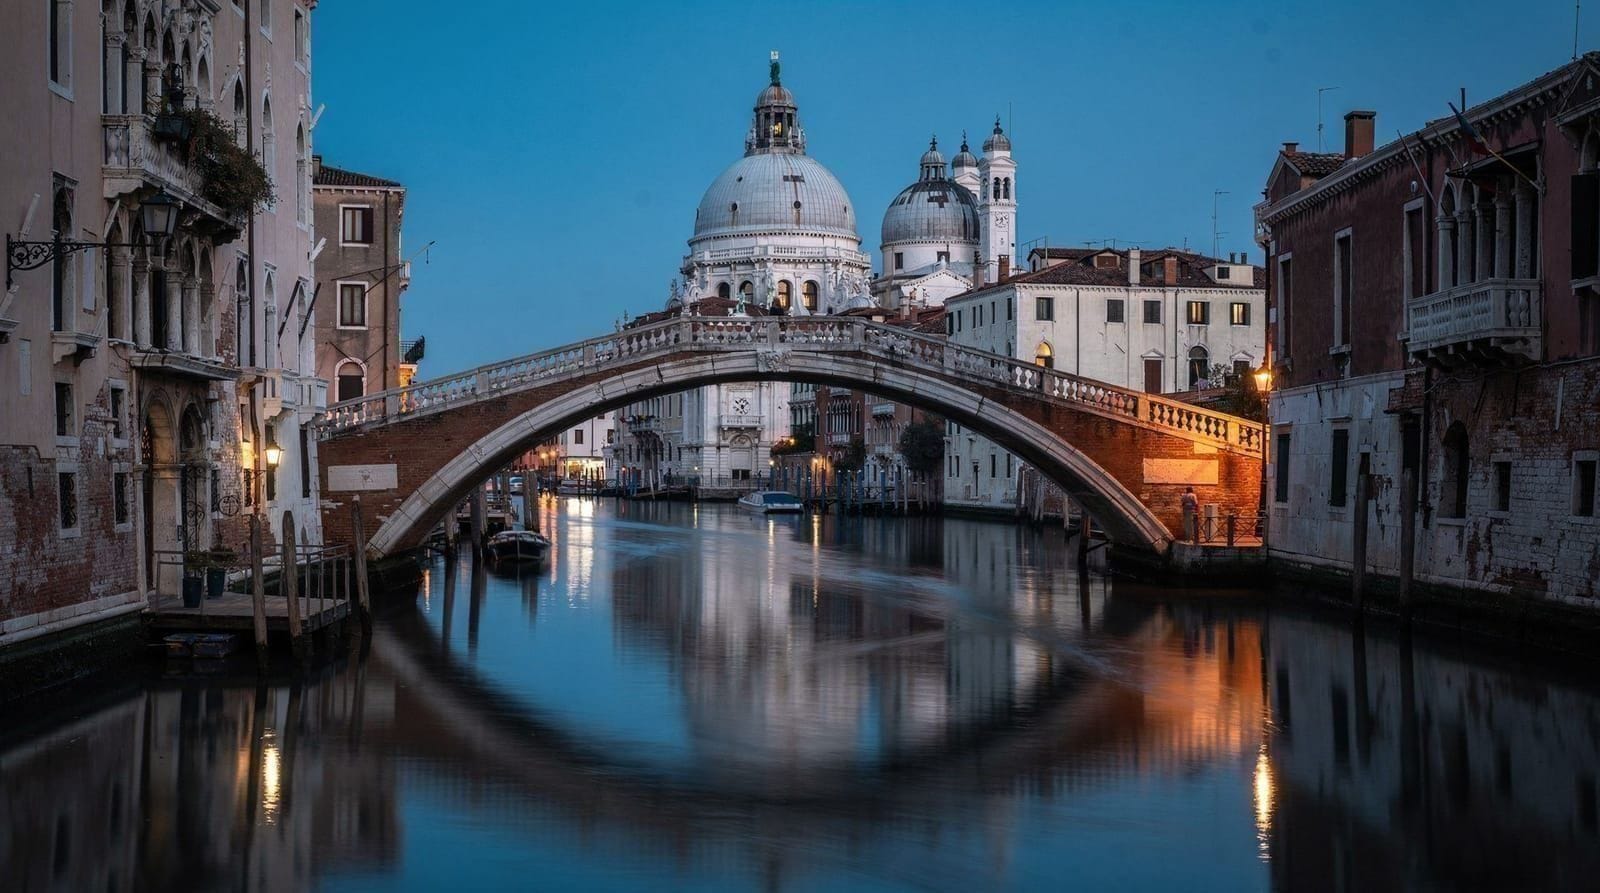
After dark: Cannaregio reflections
The canal reflections in Cannaregio after dark — where the fondamenta lamps double in still water between the buildings — are among the city’s most distinctive night images. Use a tripod and expose for 2–6 seconds on the water surface.
Day 3: San Marco, Dorsoduro, and the night fog
Day three focuses on what you have not yet photographed and, in the right season, the night fog.
Morning: the Palazzo facades and the Grand Canal
7:00am — Grand Canal palazzos by water taxi or vaporetto
The palazzos on the Grand Canal are best photographed from the water, not the bridges. Line 1 of the vaporetto is free with your day pass and passes every major facade. The best light for the west bank (Dorsoduro side) is morning; the best light for the east bank (San Polo side) is afternoon.
Book the Grand Canal film locations photo tour if you want a boat-based shooting session with a guide who knows the canal’s history:
Venice photoshoot at the Grand Canal and Rialto Bridge9:00am — Castello’s less-photographed streets
Castello east of Zanipolo church has streets and canals that are almost never in Venice photo collections. The area around Fondamenta Sant’Anna and the far eastern streets of the sestiere reward extended exploration. The light on the canal facades in the early morning is equivalent to anywhere in the main tourist zone — without the crowds.
Afternoon and evening
3:00pm — Photographic review and preparation
Review the best shots from days one and two. Identify what you still want and plan the remaining light accordingly.
5:00pm — Accademia bridge golden hour (again)
The golden hour composition from the Accademia bridge looking west is worth repeating in different weather conditions. An overcast sky gives completely different results from a clear sky. In October–November, the clouds at sunset can be spectacular.
After midnight (in November–March): fog photography
The Venice fog is a separate photographic genre that requires its own scheduling. When acqua alta and fog combine, Venice’s canals become surreal — the bridges emerge from mist, the lamp reflections stretch across water that covers the fondamente, and the sounds are muffled by both water and fog.
Fog occurs most frequently November to January, unpredictably. The MOSE barriers since 2020 have reduced the frequency of acqua alta but not eliminated it. The acqua alta guide explains the forecasting system — check the Centro Previsioni Maree website 24 hours before.
If you are visiting in this window and fog forms, set an alarm for 3am and go out with a tripod. The imagery available in Venice on a foggy winter night at 3am is not available anywhere else in the world.
Technical notes for Venice photography
Permissions: Venice has no general photography restriction in public spaces. Tripods are permitted on public fondamente and bridges. Interior photography rules vary by museum (Doge’s Palace allows photography without flash; Basilica restricts it in certain areas).
Weather: Waterproof bags are essential. Venice is a maritime environment and the humidity is extreme. Remove condensation from lenses before shooting in temperature-changed environments.
Equipment: A wide-angle lens (16–24mm equivalent) captures the compressed canal perspectives and the broad Basilica facade. A medium telephoto (70–105mm equivalent) isolates architectural details and creates natural bokeh on canal backgrounds. For phone photography: use the 0.5x ultra-wide and the 2x zoom and avoid the digital zoom beyond that.
Best apps: Magic Hour (sunrise/sunset times and golden hour calculator for any date and location). The PhotoPills app for sun position planning.
The overlooked Venice for photographers
The famous shots of Venice — gondola from the Rialto bridge, Piazza San Marco with pigeons, Bridge of Sighs from the Riva — are famous because they are correct. The light and composition in those locations are genuinely exceptional. The problem is that 2 million other people have made the same photograph.
The Venice that produces genuinely original photography is the city that exists 15 minutes’ walk from any tourist attraction:
Cannaregio’s northern streets: The streets between Madonna dell’Orto church and the northern lagoon shore are almost entirely residential. Fondamenta della Sensa, Fondamenta degli Ormesini, and the smaller canals running perpendicular to them. Morning light from the east; the subject is daily life rather than monuments.
The boat traffic: Venice’s working transport is a constant photographic subject. The garbage boat doing its early-morning collection round; the delivery boats that appear in impossible numbers each morning; the traghetto gondoliers leaning on their oars waiting for passengers. These subjects exist at the same time as the tourist crowd but are invisible to people looking past them toward the landmarks.
The interior courtyards: Many Venice palazzos have interior courtyards (corti) that are technically public but practically invisible — there is no sign indicating access and the entrance is through an archway off a narrow calle. These corti contain wells, stone staircases, vines growing up crumbling walls, and complete silence. Castello and Cannaregio have the highest density. They require wandering and trying archway entrances without certainty they lead anywhere.
The outer lagoon: The view from Venice toward the mainland is rarely photographed but extraordinary on clear days. From the northern fondamenta of Cannaregio at low tide on a November morning, the lagoon extends flat and grey to the Alps 100km north. No tourists, no gondolas, no monuments.
Torcello at dawn: The island’s cathedral mosaics and Santa Fosca church in early morning light, with a population of approximately 10 people and the first vaporetto of the day bringing three other passengers, is one of the most atmospheric places available to a Venice photographer. Requires an overnight stay in Burano or an extreme early departure from Venice.
Frequently asked questions about Venice photography
What is the single best photography location in Venice?
The Molo waterfront at sunrise, looking east across the Bacino di San Marco toward San Giorgio Maggiore. Free, always open, extraordinary in almost any weather. Read the sunrise photography guide.
Is Burano better for photography than the main Venice island?
For colour photography — specifically, street-level colour that does not rely on architectural grandeur — yes. For the full range of Venice’s visual character, the main island is richer. A photography trip to Venice should include both.
Do I need to hire a photography guide?
Not necessarily, but it helps significantly for portrait and couples sessions, and for learning location logistics quickly. A private photo walk guide covers their costs by eliminating the time spent finding the right spots in the right light windows.
How should I photograph the gondolas without it looking clichéd?
From inside one, shooting along the water surface toward the bow — the gondolier’s silhouette against canal reflections ahead. From a low bridge, looking down at the gondola in the canal. Both require being in the right position at the right time, which is easier to arrange by booking a tour.
Is Venice photography equipment safe?
The main risk is water — canals, rain, and acqua alta. Keep cameras in waterproof bags or use rain covers. Crime risk is low for camera equipment (much lower than, say, Rome or Naples). Tripods on bridges can block pedestrian traffic; be aware and move promptly when people are passing.
Top experiences
Bookable activities with verified prices and instant confirmation on GetYourGuide.